

To felt a flat roof durably, start by thoroughly cleaning and priming the surface for enhanced adhesion. Use high-quality materials like bitumen felt and guarantee all layers overlap by at least 50mm to prevent leaks. Secure the felt with galvanized nails or appropriate adhesives, particularly around corners and edges where water ingress is likely. Regular maintenance and inspections will uphold the integrity and longevity of the roof. Following extensive guidelines will further guarantee an effective roofing system.
Key Takeaways
- Clean and prime the roof surface to ensure optimal adhesion of the felt.
- Overlap felt layers by at least 50mm to prevent water ingress.
- Use high-quality adhesives and secure felt with galvanized roofing nails.
- Precisely fold and secure felt at corners to avoid tearing and leaks.
- Conduct regular inspections and maintenance to sustain the roof’s durability and performance.
How Do You Felt a Flat Roof?
The initial step in felting a flat roof involves thoroughly cleaning the roof surface to remove debris and guarantee ideal adhesion.
Preparation includes checking for and repairing any structural damages that could undermine the felting process.
Properly securing the existing felt, with appropriate fixatives and making specific overlap standards are met is essential for the longevity and effectiveness of the roof’s waterproofing capabilities.
What is the first step in felting a flat roof?
Initiating the process of felting a flat roof begins with thorough preparation of the surface. To guarantee proper installation, first, check the roof deck for any imperfections that might impair the adherence or functionality of the roofing felt.
Following this, the first layer of felt adhesive should be applied according to the manufacturer’s instructions. This step is vital as it secures the first roll of roofing felt to the roof deck, creating a foundational layer that will support subsequent layers.
It is essential to prepare the roof meticulously, applying adhesive evenly to avoid air pockets or misalignment.
Confirming that each step is performed with precision guarantees the longevity and effectiveness of the felt roofing system.
How do you prepare a roof surface for felting
Preparing a roof surface for felting begins with thoroughly cleaning the area to remove debris, dirt, and any existing materials that may compromise the integrity of the new installation.
For a successful roofing project, it is essential to guarantee the roof area is ideally prepared. Here are key steps to prepare top roofing professionals:
- Remove Old Roofing Materials: Strip away all old materials using tools appropriate for the type of existing roof.
- Repair Damage: Inspect for and mend any structural damages or weak spots.
- Clean Surface: Sweep and wash the roof surface to guarantee it is free of loose particles and dust.
- Apply Adhesive: Use a high-quality adhesive to create a solid base for the new roofing materials.
Why is it essential to secure the felt properly
Securing appropriately felt on a flat roof is essential to guarantee its longevity and effectiveness in waterproofing.
During felt installation, it is vital to make sure the roof is layered with roofing material that is adequately anchored. This helps prevent leaks and provides maximum weatherproofing.
Each layer of felt must overlap and be secured to prevent water ingress, particularly at felt edges and corners where vulnerabilities often occur. Adding extra security at these junctions guarantees that the flat roof remains protected even under harsh weather conditions.
Properly secured felt layers also mitigate the risk of blow-offs or shifting that could compromise the roof’s integrity.
Hence, securing the felt correctly is pivotal for a durable and reliable roofing system.
What Tools and Materials are Needed for Felting a Flat Roof?
When planning to felt a flat roof, selecting the appropriate roofing material is vital; bitumen felt and EPDM are commonly recommended due to their durability and ease of installation.
Calculating the amount of felt needed involves measuring the roof area and allowing for a minimum of 10% extra material for overlap and waste.
Essential accessories include galvanized roofing nails and a high-quality adhesive specifically designed for roofing applications to guarantee a secure and long-lasting installation.
Which types of roofing material are recommended
To successfully felt a flat roof, the right materials and tools are essential.
Several types of roofing material are recommended for a durable roofing system when selecting a roofing material for a flat or shed roof. The choice largely depends on the specific requirements of the flat shed roof, including climate and structural design.
Here are key materials to take into account:
- Torch-on Felt: Offers robust waterproofing, especially suitable for roof corners that require extra protection.
- Felt Rolls: Commonly used for their ease of application and effectiveness in covering large flat surfaces.
- Layer of Felt: Important for creating redundancy in the roofing system, enhancing its overall durability.
- Modified Bitumen: This material is well-suited for types of flat roofs that endure extreme weather conditions.
How much amount of felt is required
How much felt is required to cover a flat roof adequately? The amount of felt needed for felt flat roofs depends on the roof’s size and the felting method. Typically, the first layer of felt serves as the base, while a second layer of felt provides additional protection. For enhanced durability, a third or even an extra layer might be applied, extending the life of your roof.
| Layer | Purpose and Benefit |
|---|---|
| First Layer | Base coverage; waterproofing |
| Second Layer | Added protection; weather resistance |
| Third Layer | Enhanced durability; extended lifespan |
| Extra Layer | Optional for high-risk weather areas |
| Overall Layers | Multiple layers guarantee robust protection |
To lay felt accurately, measure the roof area and plan for overlap between layers to prevent leaks and maximize coverage.
What are the essential roofing nails and adhesives?
Selecting the popular material with appropriate roofing nails and adhesive is essential for the successful installation of felt on a flat roof. To guarantee the roof remains robust and the felt lay remains felt straight and secure, specific materials are recommended:
- Roofing Nails: Galvanized nails are resistant to rust and are ideal for securing the felt edges and adding extra durability.
- Bituminous Adhesive: Used for bonding layers of felt together, especially effective in overlapping areas to prevent water ingress.
- Torch-on Felt Adhesive: Essential for those opting to install torch-on felt, guaranteeing a seamless and waterproof finish.
- Hammer or Nail Gun: For efficient and reliable fastening of roofing nails, guaranteeing that the felt remains flat and intact across the entire roof and working area.
How to Manage the Corners of a Flat Roof?
Addressing the corners of a flat roof presents unique challenges due to their susceptibility to water penetration and the potential for gaps.
Proper technique involves meticulously folding the felt edges at the corners to guarantee a seamless barrier. This process necessitates precise cutting of the felt to fit the contours of the roof accurately.
This step is essential for preventing leaks and extending the lifespan of the roofing material.
What are the challenges with roof corners?
When felting a flat roof, managing the corners presents unique challenges due to their susceptibility to water penetration and the potential for material stress.
Effective handling of the corners of a flat roof is critical, as improper treatment can lead to leaks and degradation over time. Here are some key considerations:
- Material Flexibility: Guarantee the felt is flexible enough to fold around the corners without tearing.
- Secure Bonding: Properly stick the felt to the roof substrate to prevent water ingress.
- Precision Cutting: Cut the felt accurately to guarantee it fits snugly around each corner.
- Pressure Application: Firmly press the felt into place around the corners to eliminate any air gaps that could allow moisture entry.
How to Fold the Felt Edges at the Corners of a Flat Roof
Properly folding the felt edges at the corners of a flat roof is essential to guarantee a watertight seal and prevent future structural damage.
To start, lay the base layer of felt flat against the roof, ensuring it extends beyond the edge of the roof. At each corner, precisely fold the felt so it wraps snugly around the fascia board without bunching or creating gaps. Secure this fold with appropriate adhesive before applying the next layer.
For the final layer of felt, repeat the folding process, making sure the top layer overlaps considerably to cover all exposed edges. This technique not only reinforces the corner’s durability but also integrates seamlessly with the rest of the felt flat roof, ensuring thorough coverage and protection.
Why is it crucial to cut the felt accurately
Cutting the felt with precision is essential in managing the corners of a flat roof effectively. Using a cutting board and utility knife guarantees clean cuts, preventing excess felt that could result in bulky, uneven layers and potential water ingress.
Accurate cutting is vital for several reasons:
- Proper Overlap: This guarantees that the first sheet and subsequent layers of felt, such as the second and final layers, overlap correctly, avoiding gaps.
- Smooth Surface: Prevents air bubbles and wrinkles by allowing the felt to lay flat.
- Waste Reduction: Accurate measurements and cuts reduce waste, optimizing the use of materials based on square footage.
- Durability: Properly aligned and cut felt enhances roof longevity by maintaining consistent barrier integrity across all sections, especially at the corners.
How Many Layers of Felt Should a Flat Roof Have?
When felting a flat roof, industry standards recommend a minimum of three layers of felt for maximum durability and performance.
Each additional layer enhances the roof’s ability to withstand environmental stressors, thereby extending its lifespan. Considerations for using torch-on felt include the roof’s existing condition and the specific climate factors of the area.
What is the purpose of the three layers?
To guarantee ideal waterproofing and durability, a flat roof should typically have three layers of felt. This multilayer approach serves several vital purposes in the construction and longevity of roofing systems.
Here are key reasons for using three layers:
- Base Layer Security: The underlay felt acts as an initial barrier, protecting from water ingress and improving insulation.
- Mid-Layer Stability: Shed felt provides additional strength and stability, preventing tear and wear from environmental factors.
- Top Layer Protection: The capping sheet or torch on felt shields against UV rays and physical damage, ensuring a longer lifespan.
- Overlap Integrity: Several layers allow for adequate overlapping at the edges, preventing leaks at the top edge and other essential junctions.
How do many layers of felt affect the life of your roof
Understanding the impact of multiple layers of felt on a flat roof’s lifespan is vital for ensuring its durability and effectiveness in waterproofing.
Typically, a flat roofing system benefits considerably from having at least two layers of felt. This configuration enhances the roof’s ability to resist environmental damage and prolongs its overall life.
Each layer of felt acts as a barrier against moisture, preventing water ingress that can deteriorate the roof’s condition. Furthermore, the redundancy offered by multiple layers provides a safeguard against potential leaks, ensuring that even if one layer is compromised, the underlying layer still provides protection.
Consequently, integrating multiple layers of felt is essential for maintaining the roof’s integrity and functionality over time.
What considerations are there for torch-on-felt
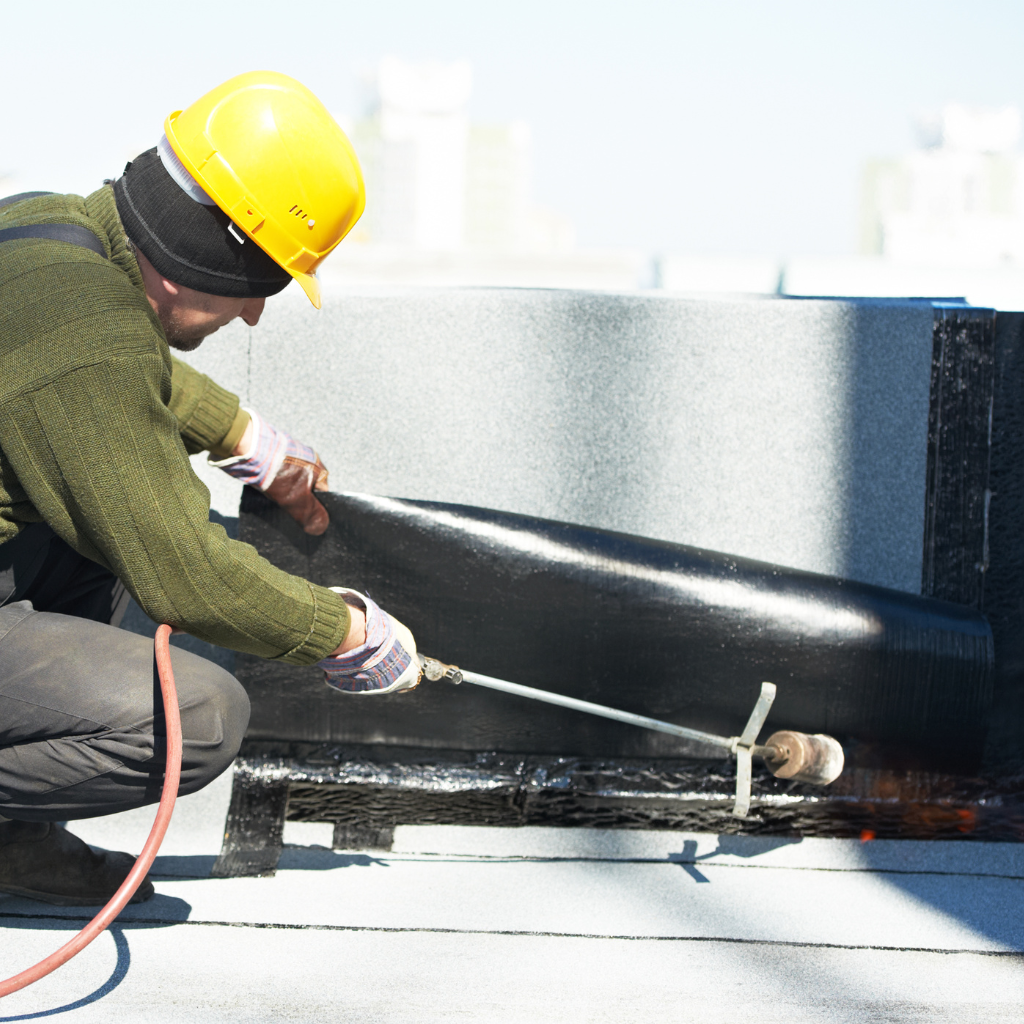
How many layers of torch-on felt are necessary for optimum performance on a flat roof? Typically, professional flat roof felting recommends at least two layers of torch-on felt for adequate protection.
This multi-layer approach guarantees better durability and water resistance, which are essential for safeguarding the roof from water damage over time.
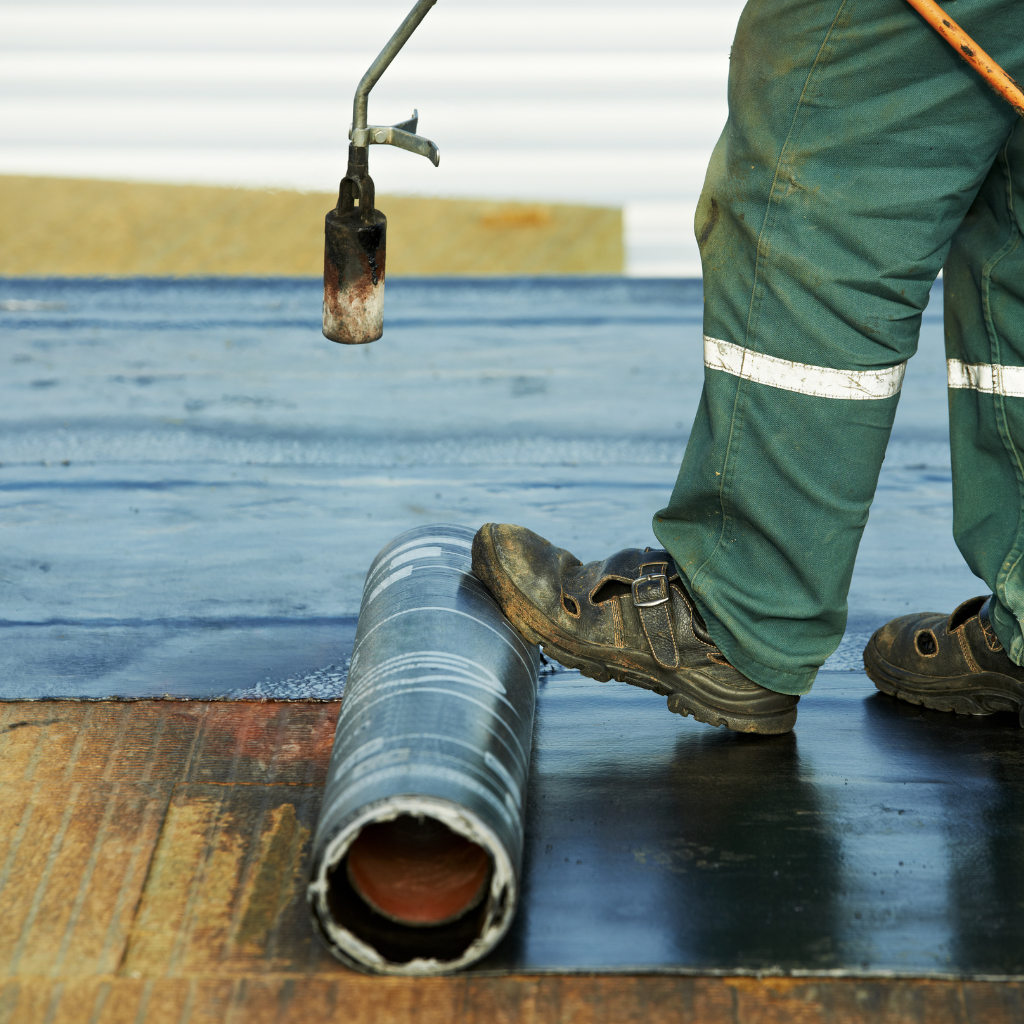
- First Layer Application: The base layer of the torch-on felt is applied using a hot gun, carefully heating the felt to bond securely to the roof.
- Second Layer Security: A second layer of felt is torched over the first, enhancing the barrier against water penetration.
- DIY Considerations: While DIY felting is possible, professional installation guarantees each layer of felt is correctly aligned and bonded.
- Maintenance: Regular inspections can extend the lifespan of the felted roof, guaranteeing layers remain intact and functional.
How to Apply Adhesive on a Flat Roof?
Selecting the correct adhesive is vital for securing the felt layers on a flat roof; bituminous adhesives are commonly recommended due to their durability and waterproofing properties.
Incorrect application of the adhesive may result in vulnerabilities, leading to potential leaks and structural damage.
To prepare the garage roof for adhesive application, verify the surface is clean, dry, and free from debris to achieve the best adhesion and sealant integrity.
What is the best layer of adhesive to use
Choosing the ideal adhesive layer is essential for the longevity and effectiveness of a felt flat roof. The adhesive binds the felt layers, ensuring they remain waterproof and securely attached to the roof’s surface.
This guide provides practical advice on selecting and applying the right adhesive.
- Bitumen-based adhesives: Ideal for traditional felt roofing, offering excellent waterproofing.
- Cold-applied adhesives: Suitable for environments where hot works are prohibited, ensuring safety without compromising quality.
- PU adhesives: Provide strong, flexible bonds that are perfect for areas with temperature fluctuations.
- Self-adhesive membranes: Simplify installation by eliminating the need for external adhesive applications, but require precise handling.
Each type of adhesive has specific characteristics suited for different conditions and types of flat roofs.
How can improper application lead to leaks?
While the choice of adhesive is essential, its correct application to prevent roof leaks is equally important. Improper application, such as applying a thin layer of glue or neglecting the verge edge, can lead to significant damage to the roof.
This damage typically manifests as leaks, especially if the felt is in poor condition or not properly secured at the edges. Ensuring that the felt overlaps adequately at the edges and using sufficient adhesive are vital steps to stop rain from driving under the felt, a common issue with popular roofing materials.
A meticulous approach to applying adhesive not only secures the felt but also extends the lifespan of the roofing system by preventing water ingress and associated damages.
What are the steps to ensure the roof is ready for adhesive?
Preparing the flat roof for adhesive application is a critical step in guaranteeing a durable and leak-proof installation. This guide is designed to teach you the essential preparations needed to effectively apply adhesive when choosing felt to cover your flat roof. Proper preparation minimizes future issues and guarantees the felt adheres correctly.
- Clean the Surface: Remove all debris, dust, and dirt to guarantee a clean bonding surface.
- Inspect for Damage: Check the entire roof area for any signs of damage or wear. Repair these areas before proceeding.
- Dry the Roof: Make sure the roofing surface is arid to avoid trapping moisture.
- Prime the Surface: Apply a suitable primer to enhance the adhesive’s bonding ability, focusing mainly on the lowest edge of the roof.
How to Ensure the Lasting Quality of a Felt Flat Roof?
Ensuring the longevity of a felt flat roof hinges on meticulous installation practices and regular maintenance.
Properly managing excess felt during installation can prevent water ingress and other structural issues.
Regular inspections and prompt repair of any wear or damage are essential to extend the roof’s service life.
How does proper installation ensure the roof lasts longer?
Proper installation is vital for maximizing the longevity of a felt flat roof. Confirming the felt is correctly applied not only preserves the integrity of the roof but also maintains its effectiveness against environmental elements.
Key installation practices include:
- Surface Preparation: Thoroughly cleaning and priming the roof surface guarantees ideal adhesion of the felt.
- Correct Overlapping: Felt layers should overlap sufficiently to prevent water ingress, following the same technique used in professional flat roofing.
- Adequate Coverage: Confirming enough felt to cover the entire area, including edges and corners, is vital.
- Sealing and Finishing: Properly sealing joints and edges with appropriate roofing compounds prevents the felt from lifting and guards against leaks.
These steps are fundamental in achieving a durable, budget-friendly flat roof.
What maintenance tips can extend the life of a felt roof?
Regular maintenance is essential for prolonging the lifespan of a felt flat roof. Periodically, inspect the third layer of felt to verify its integrity, especially after severe weather.
Using a tape measure, check the dimensions of the felt at the bottom of the roof and around the fascia board upstands, confirming that any piece of felt is securely adhered at right angles to the roof edges. Make sure triangular fillets are intact to prevent water from pooling, which can lead to leaks.
It’s vital to keep debris and leaves away from the roof surface, particularly near drainage points. Regularly clear the area around the shed and other roof structures, maintaining a clean surface to prevent organic growth and moisture retention, thereby extending the roof’s durability.
How to handle excess felt during installation
After discussing the importance of regular maintenance for felt roofs, it’s important to focus on how to manage excess felt during installation to guarantee the material’s longevity and effectiveness.
Handling surplus material correctly prevents waste and guarantees a neat finish, which is essential for the roof’s durability and aesthetic.
Here are practical steps to manage excess felt:
- Trimming: Use a sharp utility knife to trim excess felt along edges, guaranteeing tight fits and clean lines.
- Overlapping: Make sure overlaps are consistent, typically about 50mm, to create practical water barriers.
- Securing: Tack down the felt edges securely to prevent wind uplift and water ingress.
- Inspection: Regularly check for and trim any overhanging felt that could compromise the roof structure.
Conclusion
In summary, ensuring a durable, felt, flat roof involves meticulous application and adherence to technical specifications. It is essential to use appropriate tools and high-quality materials, manage corners with precision, and apply multiple felt layers as required. Proper adhesive application enhances bonding strength, which is critical for long-term performance. Regular maintenance and inspection will further safeguard the roof’s integrity, ensuring it withstands environmental stressors and prolongs its service life.


