

To replace damaged roof tiles from the inside, first identify visible cracks, breaks, or leaks that suggest tile failure. After ensuring safety with non-slip shoes and gloves, use smaller tools like a roofing hammer to navigate tight attic spaces. Carefully remove broken tiles, replace them with new ones, and secure them with roofing cement and nails. Regular maintenance and inspections will help identify potential issues early to preserve the integrity and extend the longevity of your roof. Further exploration will reveal additional preventive measures.
Key Takeaways
- Identify the exact location of the damaged tile from inside the attic.
- Push up the damaged tile gently to dislodge it from its position.
- Slide a new tile into place from the inside, aligning it with existing tiles.
- Secure the new tile with a roofing cement to prevent future displacement.
- Inspect the surrounding tiles and area for any signs of further damage or leaks.
What Are the Signs That Roof Tiles Need Replacing?
Identifying damaged roof tiles is essential for maintaining the integrity and safety of a roofing system.
Homeowners should look for cracked, broken, or missing tiles, especially in concrete and clay types, which can compromise the roof’s protective function.
Prompt replacement of these damaged tiles prevents further structural damage and potential leaks.
How to Identify Damaged Roof Tiles
When inspecting your roof, visible cracks, breaks, or missing sections in tiles are clear indicators that replacements are necessary.
Owners should routinely check for signs of roof tile damage, particularly after severe weather events. A cracked roof tile can allow water ingress, leading to further structural damage.
Similarly, a broken roof tile might compromise the roof’s integrity, making immediate roof tile replacement essential to avoid interior damage.
For missing roof tiles, the risk of exposure to natural elements increases, necessitating quick action to replace a roof tile.
Regular maintenance and replacing damaged roof tiles promptly are vital in preserving the longevity of your roofing system and ensuring the safety of the structure.
Signs of Damaged Concrete Tiles on Your Roof
After examining general damage indicators on roof tiles, it’s important to specifically focus on concrete tiles, which exhibit distinct signs when they require replacement.
Visible cracks or breaks in concrete tiles are clear indicators of a damaged tile that needs immediate attention to prevent water ingress and preserve the roof’s structural integrity.
Moreover, signs of surface wear such as spalling or flaking suggest that the concrete tile’s protective layer has deteriorated, making them susceptible to further roof damage.
Additionally, if there are instances of roof leaks, it’s often a sign that the underlying concrete tiles have been compromised.
Regular inspections and timely roof repairs involving the replacement of any compromised concrete tiles are essential to maintaining the safety and functionality of a roof.
When to Replace a Broken Clay Roof Tile
As homeowners evaluate the integrity of their roofing, it is crucial to recognize the signs that indicate the need for replacing broken clay roof tiles. Identifying these signs early can prevent further damage and guarantee the longevity of the roof.
- Visible Cracks or Breaks: A broken tile, especially if clearly visible from the ground, needs immediate attention to avoid water damage.
- Water Leaks Inside Home: Signs of water ingress suggest that a clay roof tile may have failed and require a tile replacement.
- Dislodged Tiles: If clay tiles have slipped or are missing, surrounding tiles are at risk, necessitating prompt replacement.
- Damage from Surrounding Tiles: Using a pry bar, if surrounding tiles show cracks or breaks, replace the central broken tile to prevent further damage to the structure.
What Tools and Materials Are Needed for Roof Tile Replacement?
To effectively replace roof tiles, one must be equipped with specific tools, including a sturdy ladder, a roofing hammer, and a tile cutter.
Selecting the correct type of replacement tiles is essential, ensuring compatibility with the existing roof structure to maintain its integrity and weather resistance.
Additionally, utilizing appropriate safety equipment such as non-slip shoes, gloves, and a safety harness is indispensable to prevent accidents during the repair process.
Essential Tools for Replacing Cracked Roof Tiles
Replacing cracked roof tiles requires a specific set of tools and materials to guarantee the job is done safely and effectively.
Whether dealing with concrete roof tiles or slate roof tiles, proper equipment is key to a successful repair.
Essential Tools and Materials:
- Ladder: Provides safe access to the roof.
- Slate Ripper: Crucial for removing damaged slate tiles without affecting surrounding tiles.
- Roofing cement: This is used to adhere tiles securely in place, preventing future displacement.
- Nails: Specifically designed for roofing, these nails guarantee that tiles remain fixed under various weather conditions.
Engaging a roofing contractor for advice or assistance can further guarantee that the roof repair is executed with professional oversight.
Choosing the Right Type of Replacement Tiles
After gathering the necessary tools for roof repair, selecting the appropriate replacement tiles becomes the next significant step.
When choosing the type of tile, it is essential to guarantee an exact match with the existing roof tiles. This is especially important when replacing a single tile or when only a few tiles need replacing.
Roof tiles may be made from various materials, such as clay or concrete, each with distinct characteristics and suitability. It is critical to match the new tile in both material and design to maintain the roof’s integrity and appearance.
Proper alignment and placement of the replacement tile into position also confirm that the roof remains weatherproof and structurally sound, preventing further damage and guaranteeing longevity.
Safety Equipment for Roof Repairs
Before commencing any roof repair work, guaranteeing the use of proper safety equipment is crucial to prevent injuries and accidents.
When undertaking the replacement of roof tiles, especially during or after heavy rain, certain safety tools are non-negotiable to guarantee proper installation and immediate action in the event of unexpected issues.
- Roof Ladders: Guarantee these are specially designed for roof work, providing stability and secure attachment to roof rafters.
- Harness and Safety Lines: These are critical for preventing falls, particularly on steep roofs or slippery surfaces.
- Protective Coating: Apply to roof tiles to enhance durability and slip resistance.
- Non-Slip Boots: Opt for boots with enhanced grip to maintain footing on uneven or slick tiles.
Always consult a professional roofer if unsure about the necessary tools or procedures.
How to Safely Replace a Single Roof Tile?
Replacing a single roof tile involves a methodical approach to guarantee safety and effectiveness.
Initially, the broken tile must be carefully removed to avoid damaging the surrounding tiles.
Following removal, the new tile should be accurately positioned and securely fastened to maintain the integrity of the roof’s structure.
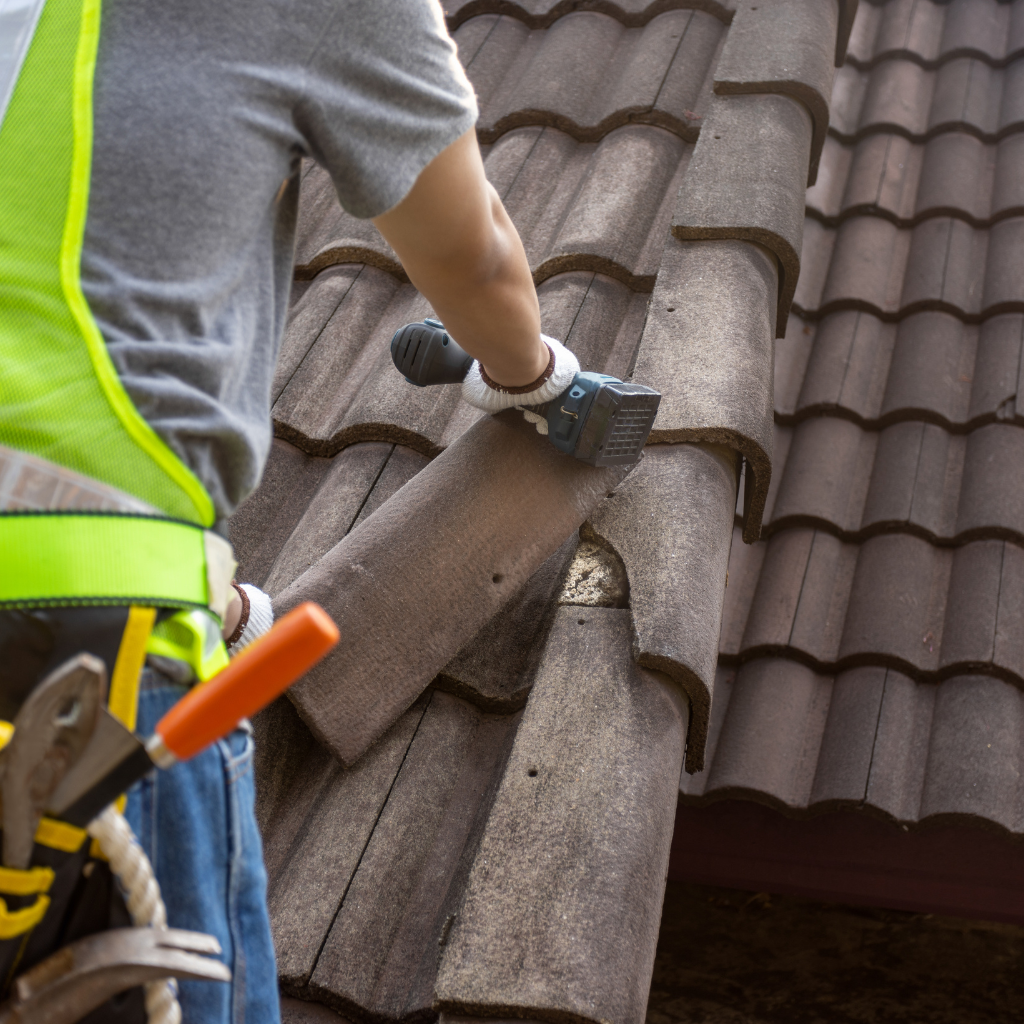
Step-by-Step Guide to Removing the Broken Roof Tile
Carefully removing a broken roof tile is the initial step in guaranteeing a safe and effective roof tile replacement job. When a single tile needs to be removed, it’s vital to avoid damaging adjacent tiles. Here’s a focused guide:
- Inspect the Area: Identify which tiles are damaged and the extent of the damage to guarantee only the necessary tiles are removed.
- Gently Lift Adjacent Tiles: Carefully lift the tiles around the broken one to access it without causing further damage.
- Remove the Broken Tile: Slide the damaged tile out, taking care not to disrupt the interlocking roof tiles.
- Check Underlayment: Inspect the area beneath where the tile was for any signs of underlying damage before placing a new tile.
Positioning the New Tile Correctly
Once the damaged tile has been removed and the underlayment inspected for further issues, the next vital step involves positioning the new roof tile accurately.
Whether a new slate tile or clay roof tile is used, confirm it matches the tiles surrounding it in material and design. For interlocking tiles, align the side locks with adjacent tiles.
Carefully slide the replacement tile under the overlapping tiles above, making sure it sits securely on the wooden batten.
The tile mustn’t displace any neighboring tiles or compromise the roof’s overall integrity.
Check that the slate tile’s lower edge aligns perfectly with other tiles to prevent future leaks or displacement.
Securing the Replacement Tile into Position
After the replacement tile has been accurately positioned, the next step involves securing it firmly to make certain it remains in place and functions effectively.
When handling roof tile maintenance, particularly securing the replacement tile into position, it’s essential to approach the task with precision and caution to avoid further damage to tiles on your roof.
Below are detailed steps for securing a replacement roof tile:
- Slide the Tile: Carefully slide the tile into the correct position, making sure it aligns with adjacent tiles.
- Check Clips: For clipped tiles, make sure the clips are properly engaged to hold the tile securely.
- Inspect Surrounding Tiles: Verify that no adjacent tiles are lifted or damaged during installation.
- Regular Maintenance: Regularly inspecting your roof will help identify missing or affected tiles early, reducing the need for extensive replacements.
Can you do a DIY roof tile replacement, or should you hire a professional?
Deciding whether to undertake roof tile replacement as a DIY project or to engage a professional involves considering several factors.
Homeowners need to weigh the pros and cons of DIY roof repair, including potential savings against risks and the quality of artistry.
For complex or extensive damage, consulting a roofing contractor is advisable, and a cost comparison between DIY and professional replacement can guide this decision.
Pros and Cons of DIY Roof Repair
While many homeowners are tempted to replace roof tiles themselves to save money, it is essential to weigh the pros and cons of DIY roof repair versus professional services.
- Cost Savings: DIY can reduce immediate outlay but may not include long-term savings if costly repairs from potential damage arise.
- Learning Curve: The process of replacing your roof requires specific skills. Inexperience can lead to mistakes, further damage, and the need to replace more tiles.
- Time Commitment: A DIY project can be time-consuming, potentially disrupting daily routines.
- Safety Risks: Roof work is hazardous. Without the proper tools and safety protocols, there’s a significant risk of injury.
Always consider these factors to maintain a healthy roof and avoid further damage.
When to Call a Roofing Contractor
Understanding when to engage a professional roofing contractor becomes essential after evaluating the challenges and risks associated with DIY roof tile replacement.
If the existing roof has extensive damage, where many tiles need replacing, or the structure requires new roof tiles, it is advisable to consult a professional. The average cost of replacing roof tiles can escalate if done incorrectly; therefore, knowing how to replace roof tiles accurately is vital.
For significant projects, such as when roof slate tiles should be replaced, the precision of a skilled contractor guarantees long-term durability and safety.
When the cost to replace approaches or surpasses the cost of professional services, or when the homeowner’s safety is at risk, that’s when to call a roofing contractor.

Cost Comparison: DIY vs. Professional Replacement
Evaluating the financial implications of DIY versus professional roof tile replacement is crucial for homeowners considering this maintenance task. Here are key considerations:
- Material Costs: DIY might reduce labor costs but doesn’t always mean savings if you need to purchase tools. Common roof tiles, like plain tile or hanging tiles made from concrete or clay, can vary widely in price.
- Risk of Additional Damage: Inexperienced handling might lead to damage to other tiles or the ceiling structure, leading to greater costs.
- Longevity and Quality: Professionals guarantee that roof tiles, whether tile or slate, are replaced correctly, minimizing the need for further repairs.
- Safety: Replacing roof tiles promptly and safely from inside requires specific skills and equipment typically possessed by professionals.
What Are the Costs Involved in Roof Tile Replacement?
Understanding the costs involved in replacing roof tiles is crucial for effective financial planning and ensuring the structural integrity of your home.
The average cost can vary widely depending on factors such as the type of tiles used, the extent of damage, and regional labor costs.
When budgeting for roof repairs, homeowners should consider these variables alongside potential safety risks associated with improper installation.
Average Cost of Replace a Roof Tiles
Replacing roof tiles can be a significant financial undertaking, with costs varying widely based on factors such as material, roof size, and geographical location.
When it comes to replacing roof tiles, understanding the average cost of replacing roof tiles is essential for planning and budgeting.
Key costs to take into account include:
- Material Costs: The price per tile varies, whether you’re using a tile next to a standard clay tile or opting for a more expensive slate.
- Labor Costs: Includes removal of damaged tiles and installation of new ones.
- Quantity of Tiles: The more tiles that need replacement, the higher the total cost.
- Additional Expenses: This may involve repairs to underlayment or structural supports.
Factors Affecting the Cost of Roof Tile Replacement
While the average costs of replacing roof tiles provide a general idea, several factors can greatly influence the final expense.
The material of the tiles markedly affects pricing; clay tiles, for instance, are typically more than concrete options, they stand out for their exceptional durability and attractive appearance.
The presence of moss and other debris can also increase costs, as additional cleaning and more extensive repairs are necessary to guarantee the roof’s integrity.
The roof’s size and accessibility play essential roles, too, as larger or more complex roofs require more time and labor.
Safety precautions needed to protect workers from falls or injuries while handling potentially slippery moss-covered or broken tiles can also contribute to higher labor costs.
How to Maintain Your Roof Tiles to Prevent Future Damage?
Maintaining roof tiles is essential to extending their lifespan and preventing costly repairs. Homeowners should follow regular maintenance tips for concrete roof tiles, such as inspecting them biannually and cleaning off any moss or debris.
To avoid common maintenance mistakes, it is vital to use the correct techniques and materials, ensuring the roof’s longevity and structural integrity.
Regular Maintenance Tips for Concrete Roof Tiles
To extend the lifespan and enhance the performance of concrete roof tiles, regular maintenance is vital. Adhering to a routine maintenance schedule prevents minor issues from becoming major, costly repairs.
Consider the following critical maintenance steps:
- Inspect Regularly: Conduct biannual inspections, checking for cracked, broken, or missing tiles, especially after severe weather events.
- Clean Tiles: Remove debris, moss, and algae buildup biannually to prevent moisture retention and guarantee water flows freely off the roof.
- Check Flashings: Verify that flashings around chimneys, vents, and skylights are sealed and in good condition to prevent water penetration.
- Prompt Repairs: Address damage immediately to prevent water infiltration and underlying roof structure issues.
How to Extend the Lifespan of Your Roof
Guaranteeing the longevity of your roof primarily involves proactive maintenance of the tiles, which shields the underlying structures from damage and deterioration.
Regularly inspecting roof tiles for cracks, breaks, or slippage is essential. Such assessments should be conducted biannually, ideally during spring and fall, to prepare for extreme weather.
Cleaning tiles to remove algae, moss, and debris also plays a crucial role in preventing the accumulation of moisture and subsequent damage. It’s advisable to use soft washing techniques rather than high-pressure systems, which can erode tile surfaces.
Additionally, confirm that gutters and downspouts are clear of obstructions to facilitate proper water drainage, thereby avoiding undue stress on the roof structure.
These steps help avert premature wear and extend the roof’s service life.
Common Mistakes in Roof Tile Maintenance
While working to maintain roof tiles effectively, homeowners often commit several errors that can compromise the integrity and longevity of their roofing system.
To avoid common pitfalls, consider the following:
- Neglecting Regular Inspections: Failing to perform routine inspections can lead to unnoticed damage that worsens over time.
- Using Incorrect Cleaning Methods: High-pressure washing can erode the surface of tiles, making them more susceptible to damage.
- Ignoring Small Repairs: Small issues like cracked tiles can evolve into considerable problems if not addressed promptly.
- Improper Installation of New Tiles: DIY tile replacement without proper knowledge can result in misalignment and gaps, leading to leaks and structural vulnerabilities.
Adhering to these guidelines can greatly enhance roof maintenance outcomes.
Conclusion
In summary, replacing roof tiles is a critical task that guarantees the longevity and safety of a home. Whether choosing a DIY approach or hiring a professional, proper tools, materials, and methods are essential. Understanding the costs involved and maintaining the roof tiles regularly can prevent future damage, saving homeowners time and money. Always prioritize safety and precision to guarantee that the roof remains secure and functional, protecting the structure and its occupants effectively.


