
Many homeowners discover that their roofs lack proper ventilation, leading to issues with damp and chilly lofts. If you’re pondering over how to install ventilation in roof systems effectively, rest assured you’re in good company.
We’ve navigated these waters before and understand the effects they can have on a home. Through thorough research, we’ve uncovered successful techniques for installing various types of roof vents that enhance airflow and minimize moisture accumulation.
Our team at Butler Roofing Services has compiled all the essential insights and practical advice necessary for approaching this task with confidence. Whether it’s selecting the ideal type of roof vents, such as ridge vents, soffit vents, or tile vents, comprehending the installation steps, or ensuring your attic is properly ventilated – we’ve got it covered.
Continue reading to make your living space more comfortable and improve its energy efficiency.
How to Install a Roof Vent?
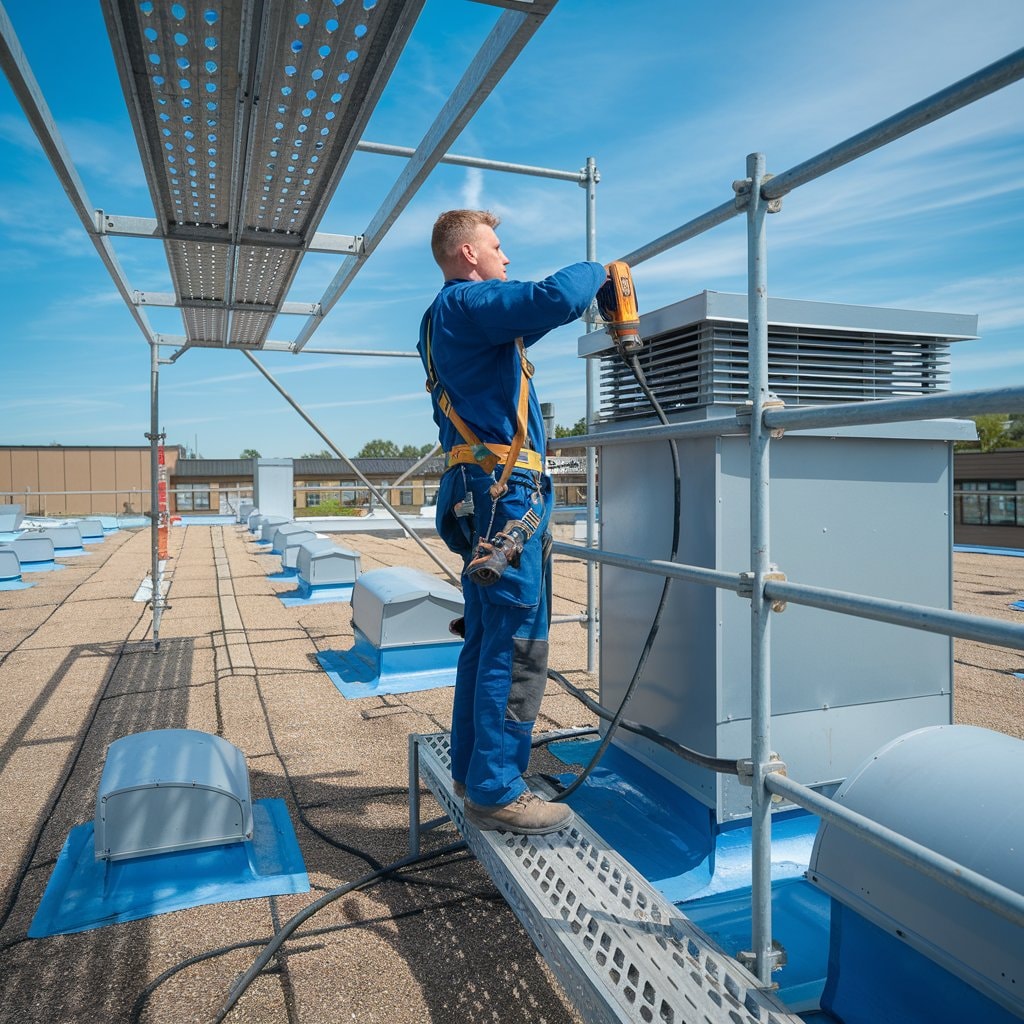
Moving from our introduction to practical steps, installing a roof vent is crucial for maintaining an effective roofing system. Our team at Butler Roofing Services always starts by preparing the roof space, ensuring it’s ready for new installations.
This includes inspecting for any pre-existing damage or issues that might affect the installation process.
We follow a step-by-step guide to install roof vents effectively. Firstly, we identify the ideal location on the roof, which usually means finding a spot near the ridge for optimal airflow.
We then cut a hole in the roofing material slightly smaller than the base of the vent to ensure a snug fit. Installing underlayment around this hole helps prevent water ingress before we put the vent into position and secure it with nails or screws.
Ensuring surrounding shingles overlap the base of the vent adds an extra layer of protection against leaks.
Preparing Your Roof Space
Firstly, we need to inspect the loft space thoroughly. This involves checking the underside of the roof for any signs of damage or wear that might affect the installation of new vents.
It’s crucial to ensure that the attic insulation does not block existing soffit vents, as this could impede airflow through your roof ventilation system. Removing any boxes stored in the attic area near where you plan to install new vents is also important.
Next, we measure and mark out where each vent will go on the roof. This step requires precision to maintain an even distribution across the roof surface and achieve effective ventilation.
We suggest consulting building regulations to confirm that your plans meet local codes for pitched roof ventilation solutions. Always prioritize safety by using suitable ladders and secure harnesses if working at heights.
Effective preparation ensures a smoother installation process.
Step-by-step Guide to Install Roof Vents
After preparing your roof space, the next important step is installing the roof vents. This process guarantees appropriate air circulation in your attic space, preventing condensation and prolonging the lifespan of your roof.
- Select the appropriate vent for your roof. It could be ridge vents, soffit vents, or tile vents; selecting the correct one is crucial for efficient ventilation.
- Procure all essential tools and materials. You’ll require a saw, drill, nails or screws, roofing cement, and the vent itself.
- Mark the spot on your roof where the vent will be fitted. It should be as near to the ridge as feasible for optimal effectiveness.
- Make an opening in the roof using a saw. The size of this opening must correspond perfectly with the size of the vent you’re fitting.
- Administer roofing cement around the perimeters of the hole. This forestalls water from infiltrating around your new vent.
- Position the vent over the hole and secure it with nails or screws to your roof’s structure.
- Seal any spaces between the roof and vent with extra roofing cement to guarantee a water-tight seal.
- Fit flashing around the base of the vent if necessitated by its design to forestall water entry further.
- Repeat these steps for each vent until all necessary for efficient ventilation are installed.
We consistently advocate for employing a professional roofer if you’re uncertain about conducting these tasks safely by yourself. A professionally installed roof ventilation system reduces energy costs and prevents ice dams. It also prolongs the life of your insulation and shingles by minimizing moisture accumulation under your roof material during the cold season or hot air during summer.
Common Challenges in Installing Roof Ventilation
At Butler Roofing Services, we frequently encounter hurdles during the process of roof ventilation installation. These can change in accordance with the type of roof, the building’s age, and regional weather conditions.
- Figuring out the correct amount of ventilation necessitates expertise. Insufficient ventilation results in condensation and heat buildup, while excessive ventilation could be costly and impact the roof’s stability.
- Coordinating vents with existing roof tile or slate isn’t invariably direct. Colors and profiles may be out of production or challenging to locate.
- Establishing ridge ventilation without affecting the roof’s waterproofness is an exacting task. It calls for diligent removal and replacement of roof tiles.
- Incorporating soffit vents in residences lacking sufficient eaves space introduces its unique set of challenges. At times, there’s simply inadequate space for correct installation.
- Estimating the number of vents required involves grasping intricate roofing concepts like cold roof and warm airflow, which might not be universally understood.
- Addressing inadequately ventilated loft spaces complicates the installation process. Pre-existing issues such as mold or structural dampness need to be resolved first.
- Creating vent openings without harming underlying roofing felt requires precision. An incorrect cut can result in leaks and other waterproofing issues.
- Adding vents to existing roofs implies evaluating structural stability. Aged roofs might not sustain new ventilation systems without certain modifications.
- Complying with local building regulations can prolong projects. Every area features specific stipulations for the degree of ventilation necessitated in residential buildings.
Let us proceed to examine the diverse types of roof ventilation at hand today.
What are the Different Types of Roof Ventilation?
Different types of roof ventilations serve various purposes, ensuring homes stay comfortable and energy bills remain low. Ridge ventilation runs along the roof’s peak, allowing hot air to escape from the attic.
They blend seamlessly with the roof line, making them a favored choice for homeowners looking for unobtrusive options. Soffit vents are positioned at the eaves of your roof. These allow fresh air to flow into the attic, balancing the temperature and preventing moisture buildup that can lead to mold.
Tile or slate vents integrate directly with your roofing material, offering ventilation solutions for specific types of roofs, such as concrete interlocking tiles or natural slates.
Each type of vent serves a unique function, whether it’s promoting air circulation through continuous soffit vents or expelling hot air via tile roof vents. Selecting the right kind ensures effective ventilation across different areas of your home.
Let’s explore how many roof vents you need for optimal efficiency and comfort in your space.
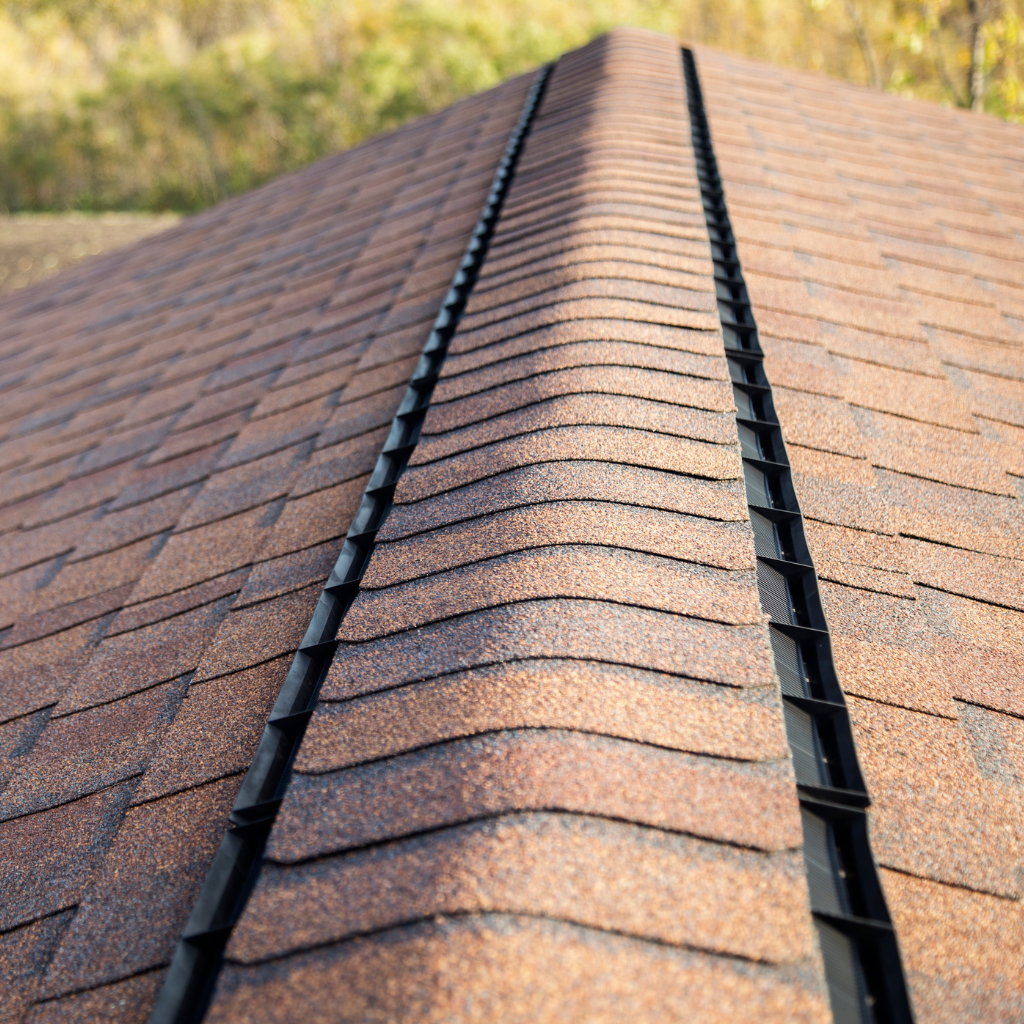
Understanding Ridge Ventilation
Roof Ridge ventilation plays a crucial role in maintaining a healthy roof space. These vents run along the peak of the roof, allowing warm, moist air to escape from the attic or loft. This prevents condensation buildup, which can lead to issues like mold and structural damage, damp issues, and rot in the roof structure.
Installing ridge vents is straightforward and does not disrupt the aesthetic of your house.
Proper ventilation through ridge vents ensures your roof remains dry and efficient throughout the year.
We fit ridge ventilation by cutting an opening along the top of your roof. This creates a continuous vent space under the ridge cap for air to flow freely. Ridge ventilation is best combined with soffit vents to enable cool, fresh air to enter from below, pushing out warm air above and ensuring full circulation across the entire length of your loft space.
Exploring Soffit Ventilation
We often install soffit ventilation in homes and buildings. These vents sit under the roof’s overhang, which is known as the soffit. Their main job is to pull fresh air into the attic.
This flow of air helps keep the attic cool and dry. It also stops moisture from building up, which can lead to mold.
Soffit vents come in various types, like circular soffit vents and fascia vents. They work best when paired with a ridge or roof tile vent. This setup allows air to enter through the soffit and leave through the top, creating a steady airflow across the entire attic space.
For effective ventilation, every part of your roof must work together properly.

Choosing Tile or Slate Ventilations
Choosing the right type of ventilation for your roof involves considering tile vents or slate vents. These options are ideal for maintaining the aesthetic appeal while ensuring efficient airflow.
Tile and slate vents integrate seamlessly with your existing roofing materials, offering a solution that prevents condensation buildup without compromising on style. They’re easy to install and work perfectly in both new builds and renovations.
Their design allows them to sit flush with the roofline, making them virtually invisible.
Our experience shows that opting for these ventilations significantly enhances roof longevity by enabling high-level ventilation. This choice is particularly beneficial in colder months when preventing moisture accumulation is crucial.
Next, we’ll explore how to calculate the amount of ventilation required for your space.
How Many Roof Vents Do I Need?
Calculating the amount of ventilation required for your roof depends on a few critical factors. At Butler Roofing Services, we often advise our clients that for every 150 square feet of attic space, one requires at least one square foot of vent area split equally between intake and exhaust to maintain an efficient level of ventilation.
This rule ensures effective roof ventilation, helping to prevent condensation buildup and poorly ventilated roofs.
Several elements affect the number of vents you may need, including the pitch of your roof and any existing loft insulation. In areas with higher humidity or in homes where significant temperature differences are common between indoor and outdoor environments, it might be necessary to adjust this ratio for optimal performance.
Now, let’s look into what the cost of roof vents entails.
Calculating the Amount of Ventilation Required
At Butler Roofing Services, we comprehend the significance of accurate roof ventilation for the well-being and efficacy of your roof. Precision in calculating the necessary ventilation is paramount.
- Initiate the process by sizing up your attic space in square feet. This measurement will be foundational in identifying how much ventilation is required.
- Stick to the general guideline of needing 1 square foot of net free vent area (NFVA) for every 150 square feet of attic floor space if your attic is without a vapor barrier.
- If your attic is equipped with a vapor barrier, alter the ratio to 1 square foot of NFVA for every 300 square feet of attic space.
- Halve your total calculated NFVA to achieve balance intake and exhaust ventilation, facilitating the smooth transition of air through the roof space.
- Keep in mind local building codes and ventilation prerequisites as they may differ and potentially influence the minimum ventilation necessary.
- Analyze the steepness of your roof; roofs with a higher pitch possessing more volume may necessitate more ventilation than the standard calculation.
- Include special factors such as skylights, intricate roof designs, or existing vents that could hinder air movement, potentially needing additional vents for compensation.
- Strategically place lap vents or felt lap vents to improve air circulation in specific areas prone to moisture retention or heat accumulation.
- Keep in mind prospective modifications you might implement, like installing a bathroom vent or altering roofing materials, which could influence your ventilation demands.
- Always engage with a professional roofer to assess the unique features of your roof and verify the exact number of vents required.
Our past work has demonstrated that adhering to these measures frequently results in not merely fulfilling but quite often surpassing standard ventilation prerequisites, equipping homes with healthier, longer-lasting roofs capable of managing condensation and temperature control with improved efficiency.
Factors Affecting the Number of Vents
Several factors determine how many vents your roof might need. The size of the space under your roof plays a big role. Larger areas require more ventilation to handle airflow effectively.
Roof type also influences vent numbers. For example, roofs with high pitches allow for better natural air movement, which can reduce the total number of vents required compared to flat or low-pitched roofs.
The local climate is another crucial factor. Homes in hotter regions may need more vents to dispel the heat and prevent buildup in the attic, whereas cooler climates focus on preventing moisture accumulation through proper ventilation.
Each house has unique ventilation requirements based on these conditions. We always consider these elements carefully when advising homeowners on their roofing solutions, aiming for ideal attic ventilation that meets both practical needs and building regulations.
Ensuring Effective Roof Ventilation
We always stress the importance of calculating the right amount of ventilation for your roof. This step prevents moisture buildup and condensation in the roof, safeguarding your home from potential damage.
Installing a mix of exhaust vents and soffit boards ensures air flows smoothly through your loft, maintaining an ideal temperature inside.
Our experience shows that combining ridge ventilation with soffit vents offers high-level ventilation, which is crucial for both new roofs and retrofitting existing ones. We guide our clients to choose the correct type and number of vents, factoring in roof pitch and house size.
Effective roof ventilation extends your roof’s lifespan by preventing heat buildup during summer and ice dams in winter months.
What is the Cost of Roof Vents?
Different types of roof vents come with different price tags, influenced by their structure and quality. For example, basic models of static vents might begin at a friendly £15 per unit.
Conversely, more advanced systems like turbine vents or ridge ventilation may require a higher investment, possibly rising to £100 or more per unit. The material used and design intricacy play a significant role in determining these costs.
Deciding on the ideal ventilation solution involves a careful consideration of both budget and performance requirements. The cost of vent tiles can also range extensively; for instance, concrete interlocking roof tiles with integrated vent holes might come at about £30 per unit.
It’s necessary to take into account both the initial cost as well as any potential installation charges if you’re considering engaging a professional roofer to efficiently set up a roof vent system on your existing or new roof structure.
Understanding the Vent Cost Components
We understand that for many homeowners and builders, the cost of roof vents is a critical factor in their decision-making process. The price of installing roof ventilation depends on several components.
These include the type of vent, such as ridge vents or soffit ventilations, the materials used, and the complexity of installation. For example, fitting a loft vent involves not just the cost of the vent itself but also potentially modifying fascia boards and ensuring there are no issues with the lack of ventilation elsewhere in the roof.
The key to budget-friendly roofing solutions lies in choosing the right type of vent for your specific needs and understanding all associated costs.
Labor costs can vary widely depending on the location and whether any additional work is necessary to install effective high-level ventilation systems. A straightforward job like installing eaves vents might take less time and, therefore, be more affordable than more complex installations requiring changes to normal roof structures or retrofitting vents into an existing build.
Material costs also fluctuate depending on quality; however, investing in durable materials upfront can reduce long-term maintenance expenses.
Budget-Friendly Ventilation Solutions
Finding budget-friendly ventilation solutions is key for homeowners, decorators, builders, and contractors. We often recommend exploring options like soffit vents or ridge vents as a cost-effective way to ensure effective roof ventilation.
These types do not require major modifications to the existing structure, making them an ideal solution for those conscious of spending.
For those looking to ventilate the roof without breaking the bank, installing a new roof tile vent can be an economical choice. This method allows us to cut into the existing tiles and fit a roof tile vent directly.
Such installations offer high-level ventilation and can significantly reduce buildup in the roof void at a lower cost compared to more complex systems.
Can I Install Roof Vents on an Existing Roof?
At Butler Roofing Services, we frequently encounter homeowners wondering if it’s viable to append roof vents on an already established roof. Undoubtedly, the answer is affirmative.
The process of roof vent installation can drastically enhance airflow while decreasing moisture accumulation in your attic, key elements in maintaining your roofing system’s health.
Our competent team excels in incorporating various ventilation solutions to existing roofs without impacting their resilience.
Supplementing ventilation post-construction can elevate a building’s energy efficacy and extend its longevity.
Alterations during the process of installation encompass precise incisions into the roof or soffits to integrate new vents while ensuring the waterproof features remain intact. This procedure demands a keenness for detail and comprehension of the roof’s gradient and soffit’s length, aspects that directly govern the number of vents required for optimum outcomes.
We consistently advocate for a consultation with proficient roofers like ourselves at Butler Roofing Services, who are proficient in sophisticated ventilation systems suitable for various roof types, including tile, slate, or ridge ventilation.
Enhancing your current structure with sufficient ventilation contributes positively by revamping air circulation and abating heating expenditures during winter by inhibiting ice dam formation on your roof.
Assessing Your Existing Roof for Ventilation
We always check the pitch of the roof first. This determines what kind of vents can be fitted. A low-level ventilation system might work best for shallow pitches, while high-level ventilation suits steeper roofs.
Next, we measure the length of the soffit to decide on the number and type of soffit ventilations needed.
Our team inspects for signs that show if your existing roof has enough breathing space. These include damp spots or heat buildup in attic spaces. If these issues exist, it means your current system isn’t doing its job well.
We then advise on installing new roof vents or improving the existing ones to ensure effective airflow throughout your home.
Modifications Needed for Installing a Roof Vent
Installing roof ventilation requires careful planning and specific modifications to your existing roof structure. Our team at Butler Roofing Services has identified the key changes needed to ensure a successful installation.
- Inspect the attic space for any signs of moisture buildup or damage. This step is vital before starting any work on the roof.
- Calculate the amount of ventilation required based on the size of your attic. This ensures you install enough vents for effective airflow.
- Choose the right type of vent that suits your roof’s design and needs, be it ridge, soffit, or tile vents.
- Mark out where each vent will be installed on the roof. Precision here avoids mistakes and unnecessary damage to tiles or slates.
- Cut openings in the roof with care, making sure they match the size of the vents being installed. Accurate cuts prevent leaks and improve performance.
- Strengthen the roof structure around vent sites if necessary. Some roofs may need additional support to hold new vents securely.
- Seal around each vent with appropriate weatherproofing materials. This keeps water out and ensures longevity for your ventilation system.
- Check local building regulations before starting work. Compliance with these rules is essential for both safety and legality.
Next, we will look into how many roof vents you need for optimal functionality.
Benefits of Retrofitting Roof Ventilation
After reviewing the alterations required for the installation of a roof vent, we suggest investigating the benefits of introducing roof ventilation to your existing property. The introduction of roof ventilation presents a practical strategy to enhance airflow within your home.
It safeguards against moisture accumulation, which can prompt mold growth and structural damage. Our measures for suitable ventilation aid in maintaining the longevity of your roof materials, effectively prolonging their service life.
The introduction of roof ventilation facilitates vent installation at specific points on your roof, bypassing the requirement for a total renovation. Ensuring you enjoy better air quality within your home while sidestepping the steep expenses linked to the substitution of a whole roofing system.
Furthermore, contemporary vents are designed to integrate faultlessly with your current roofing style, making them aesthetically favorable as well as functional. Through this method, homeowners experience improved temperature control in their homes, contributing to reduced heating and cooling expenses annually.
Conclusion
Implementing ventilation in your roof might appear as a considerable endeavor for numerous homeowners, decorators, builders, and contractors. It calls for a commitment of both time and resources.
Our squad at Butler Roofing Services is present to shepherd you through every phase of the operation. From the selection of the appropriate variety of vents for your residence to resolving the quantity you require for efficient ventilation, we’ve got your back.
Choosing to establish roof ventilation can considerably enhance air circulation within your residence. This method extends the life of your roof and also boosts energy economy, resulting in reduced utility charges and a more agreeable living surrounding.
Be it integrating vents on an existing roof or bringing them into new construction, our proficiency guarantees you receive the most favorable outcomes achievable. We’re devoted to assisting you in attaining prime ventilation with minimum inconvenience.


